
Export Power BI Report using Microsoft Power Automate
Exporting Power BI
reports manually can be tedious, especially when data updates frequently.
Microsoft Power Automate offers a streamlined, automated approach to export
Power BI reports, saving time and enhancing productivity. In this guide, we’ll
explore how to set up automated Power BI report exports using Power Automate
and discuss some useful scenarios where this functionality can drive
efficiency.
Why Automate Power
BI Report Exports?
Power BI is a powerful
tool for generating data insights, and while users can interact with dashboards
online, certain business cases require reports in PDF, PPT, or PNG formats for
documentation, compliance, or distribution. Automating this process with Power
Automate offers several benefits:
- Time Savings: Automate repetitive tasks, like
exporting monthly or weekly reports.
- Consistent Reporting: Ensure reports are generated and
distributed without delays.
- Seamless Integration: Use triggers and workflows to send
reports to stakeholders or external systems.
Prerequisites
Before setting up
Power BI report exports with Power Automate, ensure the following:
- Power BI Pro or Premium License: Necessary for access to export
functions.
- Admin Permissions: You’ll need permission to view and
export reports within your workspace.
- Power Automate Access: Power Automate and Power BI both need to
be accessible through your organization’s accounts.
Step-by-Step Guide
to Automate Power BI Report Exports
- Create a Flow in Power Automate
Open Power Automate and click on "Create" to start a new flow. Select "Scheduled Cloud Flow" to create a flow based on time intervals (e.g., daily, weekly, monthly). Alternatively, you can trigger it manually or based on specific actions, such as a data refresh in Power BI. - Set Up Power BI Export Action
Once inside your flow, add a "Power BI" action by searching for "Export to File for Power BI Reports." Here, specify the workspace, report name, and page to export. You can select the export format, including PDF, PPT, or PNG, based on your needs. - Define Parameters (Optional)
Some reports may require parameters, especially if you’re filtering data by date or region. Use dynamic content in Power Automate to pass these parameters, allowing your export to capture specific insights for each automated report instance. - Add a Delay (Optional)
If you need the flow to pause after exporting, especially in workflows with complex branching, you can use the “Delay” action to introduce a wait time. This is useful for ensuring that subsequent actions don’t interrupt the export process. - Distribute the Report
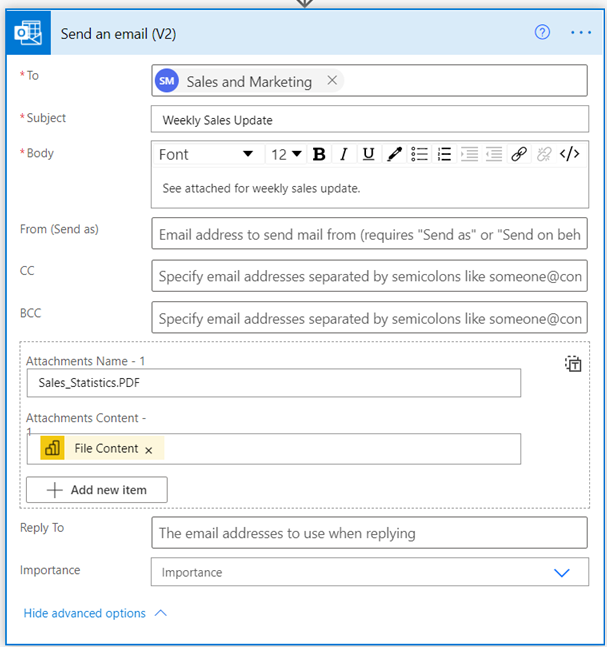
Add a final action to share the exported report with your audience. Options include sending an email with an attachment, saving the file to OneDrive, or uploading it to SharePoint. Power Automate supports many connectors, making it easy to send reports wherever they’re needed. - Test Your Flow
Once everything is set up, click on "Test" to ensure your flow works as expected. Verify that reports are correctly exported, formatted, and sent to the specified destination.


Practical Scenarios
for Power BI Export Automation
- Monthly Reports for Stakeholders
Schedule Power BI report exports at the start of each month to share key metrics or summaries with stakeholders. Automating this reduces the manual work needed each month. - Compliance and Audits
Automate report generation for compliance requirements. Ensure reports are consistently formatted and saved to a secure location, helping with documentation and audit trails. - Regional Performance Reports
Generate customized reports for different regions by applying specific parameters in Power Automate. Automatically deliver region-specific insights to each department. - Presentation-Ready Reports
Convert reports into PowerPoint presentations using the PPT export format, saving teams time on preparing visuals for meetings and presentations.
Tips for Optimizing
Power BI Report Exports
- Monitor Flow Run History: Check the history to understand any
issues and optimize performance. Repeated flow failures may indicate
permission or connectivity issues.
- Use Variable Parameters: Customize reports based on dynamic data
inputs, allowing automated exports to remain relevant as business needs
evolve.
- Leverage Power Automate Approvals: In scenarios where reports require
review, integrate the "Approvals" action to hold and release
reports only after approval.
Conclusion
Automating Power BI
report exports using Power Automate can significantly improve data
accessibility and streamline reporting processes. By combining Power BI's
analytical power with Power Automate's workflow capabilities, businesses can
achieve new levels of productivity and ensure stakeholders have timely access
to insights.
This comment has been removed by a blog administrator.
ReplyDelete