Automate Solution Imports from GitHub to Power Apps
In today's fast-paced digital landscape, keeping your
applications up to date is crucial for maintaining efficiency and leveraging
new features. This blog post guides you through creating a Power Automate flow
that automatically imports solutions from a GitHub repository, ensuring your
applications are consistently updated without manual intervention.
Flow Overview
This automated solution involves a Power Automate flow that
runs on a schedule to:
- Check
for the latest release from a GitHub repository.
- Download
the latest solution file if it meets specified criteria.
- Upload
the file to OneDrive for Business.
- Import
the solution into the Common Data Service automatically.
This streamlined process ensures that your applications
benefit from the latest updates, enhancing functionality and performance.
Step 1: Recurrence Trigger
- Purpose:
Set up a schedule for the flow to run automatically. For example,
configure it to trigger every three months.
- Parameters:
- Frequency:
Set to "Month."
- Interval:
Set to 3.
By establishing a regular cadence, you can ensure that your
applications stay updated without needing manual checks.
Step 2: Initialize Variables
- Purpose: Define variables to store the download link and asset name of the solution file you want to import..
Actions:
- Variable
1: varDownloadLink
- Type:
String
- Initial
Value: Leave empty (this will be set dynamically in later steps).
- Variable
2: varDownloadName
- Type:
String
- Initial
Value: Leave empty (this will also be set dynamically).
Step 3: HTTP Request
- Purpose:
Make a GET request to the GitHub API to retrieve information about the
latest release from the specified repository.
- Parameters:
- Method:
GET
- URI:
https://api.github.com/repos/microsoft/coe-starter-kit/releases/latest
This request fetches essential information about the latest
release, including asset details necessary for the next steps.
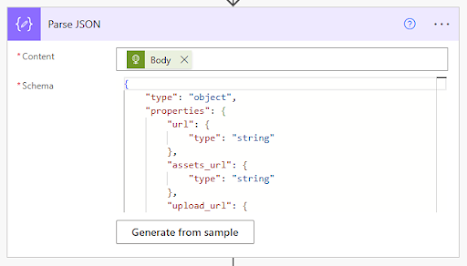
Step 4: Parse JSON
- Purpose:
Convert the JSON response from the HTTP request into a structured format
that Power Automate can easily manipulate.
- Parameters:
- Content:
Set to the body of the HTTP request.
- Schema:
Define the expected structure of the JSON response to facilitate easier
data extraction.
Parsing the JSON ensures that you can accurately access and
work with the data you need to proceed.
Step 5: Apply to Each
- Purpose:
Loop through each asset in the release to identify relevant solution files
for import.
- Parameters:
- ForEach:
Extract the assets using the expression @body('Parse_JSON')?['assets'].
This step allows you to filter the assets and pinpoint the
specific solution files you wish to import.
Step 6: Conditional Logic
Within the Apply to Each loop, implement a condition
to determine which assets should be processed.
- Condition:
Check if the asset name contains a specific identifier, such as "CenterofExcellenceCoreComponents".
- Actions:
- If
the condition is met, store the download link and the asset name in
variables for use in the subsequent steps.
This filtering ensures that only relevant files are
downloaded and imported, optimizing the flow's efficiency.
Step 7: File Download
- Purpose:
Use an HTTP GET request to fetch the solution file from the identified
download link.
- Parameters:
- Method:
GET
- URI:
The dynamic value of @variables('varDownloadLink').
This action retrieves the solution file required for the
import process.
Step 8: Upload File to OneDrive
- Purpose:
Upload the downloaded file to OneDrive for Business, ensuring it’s
accessible for the next step.
- Parameters:
- Host:
Configuration details for connecting to OneDrive.
- Source:
Reference the Location Header (outputs('HTTP_2')['headers']?['Location']) from the file download action.
- Destination:
Specify the OneDrive path for the uploaded file.
- Configure run after:
Uploading the file creates a bridge to access the solution content for importing.
Step 9: Get File Content
- Purpose:
Retrieve the content of the uploaded file from OneDrive to prepare for
importing into the Common Data Service.
- Parameters:
- Host:
Connects to OneDrive.
- Parameters:
Use the uploaded file's ID to retrieve its content.
This action is critical for obtaining the actual solution
content needed for the next step.
Step 10: Compose
- Purpose:
Prepare the file content for the import action, ensuring the data is
formatted correctly for the next step.
- Parameters:
- Inputs:
Set to the contents (body('Get_file_content')?['$content']) of the Get File Content action.
This preparation is essential for successfully importing the
solution into your environment.
Step 12: Perform Unbound Action
- Purpose:
Automate the import of the solution into the Common Data Service using the
prepared content.
- Parameters:
- Host:
Configuration for connecting to the Common Data Service.
- Parameters:
- actionName:
Set to "ImportSolution".
- Include various configuration options such as OverwriteUnmanagedCustomizations and CustomizationFile, where the latter is derived from the Compose action output and ImportJobId to a random GUID.
This final step executes the import, ensuring that your
applications are updated with the latest enhancements and features
automatically.
Conclusion
By implementing this Power Automate flow, you can automate
the process of importing solutions, keeping your applications up to date
effortlessly. The flow's structure allows for regular checks for new releases
and ensures that only relevant solutions are downloaded and imported.
With this automation in place, you can focus on higher-level
tasks while your applications remain current, reducing manual workload and
potential errors.
Power Automate’s capabilities provide a powerful tool for
enhancing your workflow efficiency, ensuring that your solutions are
consistently aligned with the latest developments.
%20copy.png)


nice post
ReplyDeleteDear Ahmad, thanks for your detailed tutorial. my download http request creates a status code 302 Found redirect. I catch this with a condition to read the headers/Location. with the redirect url my download http request2 succeeds. however I dont know how to upload to oneDrive from Source as my second http request has Location header anymore...
ReplyDeleteI added the redirect url directly as source url in the oneDrive Upload Action instead of another http GET and it now works flawlessly...!! :)
Deletenow I have learned that the oneDrive upload action can even handle the redirect!!! even better ;)
Delete