Introduction:
Power Automate, formerly known as Microsoft
Flow, is a powerful automation platform that allows users to create workflows
to automate tasks across various applications and services. In this blog, we
will explore how to send an HTTP request using Power Automate and then apply a
Do Until loop on the JSON response to efficiently handle data processing and
task automation. This combination of HTTP requests and loops can be
particularly useful when working with APIs or web services that return JSON
data.
Step 1: Sign in to Power Automate
- Open
your web browser and navigate to the Power Automate website (https://flow.microsoft.com/).
- Sign
in using your Microsoft account or work/school account.
Step 2: Create a New Flow
- Click
on the "Create" button in the top navigation bar.
- Select
"Instant cloud flow" to create a new flow from scratch.
Step 3: Trigger the Flow
- Choose
a suitable trigger for your flow. For this example, we will use the
"Manually Trigger a Flow" trigger to run the flow at a set interval.
- Configure
the name as per your requirements.
Step 4: Add the HTTP Request Action
- Click
on the "+ New step" button.
- Search
for "HTTP" in the action search bar and select "HTTP"
from the list of actions.
- In the
HTTP action, specify the method (GET, POST, etc.), URI, and any required
headers or parameters for your specific API or web service.
Step 5: Parse the JSON Response
- After
the HTTP action, add a new action by clicking "+ New step."
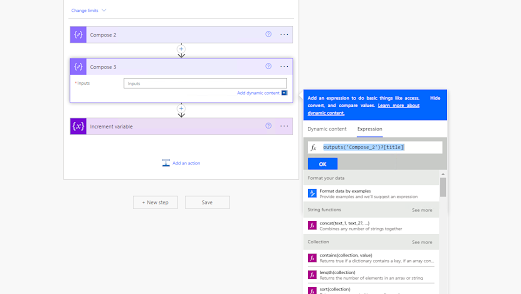
- Add a new step called compose
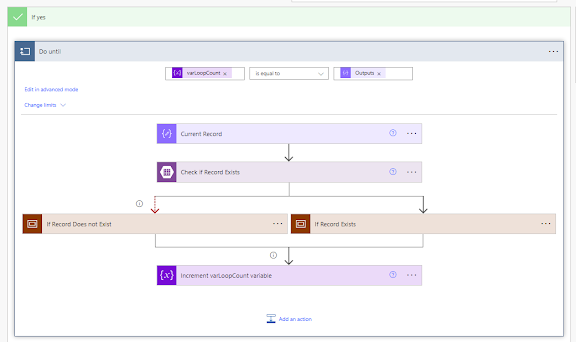
Step 6: Apply the Do Until Loop
- Add a
new action after the "compose" action.
- Search
for "Do Until" in the action search bar and select "Control
- Do Until."
- In the
"Condition" field, specify the condition for the loop to
continue. For example, you can use a variable and length of response.
- Inside
the "Do Until" loop, include the actions that you want to
execute repeatedly until the condition is met.
Step 7: Handle Data and Loop Exit
- Add a new step called "increment a variable" and increment at the end of all the actions inside the loop.
Step 8: Save and Test the Flow
- Click
the "Save" button in the top-right corner to save your flow.
- Test
the flow to ensure it runs without any errors. You can use sample data or
real data from your API to validate the behavior of the flow.
Conclusion:
In this blog, we've explored how to send an HTTP
request in Power Automate and apply a Do Until loop on the JSON response. By
combining these powerful features, you can automate complex tasks that involve
working with APIs or web services efficiently. Power Automate's user-friendly
interface and extensive integration capabilities make it an ideal choice for
automating repetitive tasks and improving overall productivity. So go ahead and
explore the possibilities with Power Automate to streamline your workflows and
save time on repetitive manual processes. Happy automating!


Comments
Post a Comment