
How to Add a Calendar View in Your Model-Driven App
If you're using Power Apps and want to make your data more visually appealing and organized, a calendar view is a great choice. It's perfect for managing events, appointments, tasks, and other time-based data in your Model-Driven App. In this easy-to-follow guide, we'll walk you through the process step by step. We'll also talk about the specific things you'll need to make your calendar work effectively, such as the essential fields like Description, Start Date, and End Date.
What You Need for the Calendar Control to Work
To make your calendar control really shine, you'll need a few specific fields in your entity (table):
Description: This is where you can jot down extra info or notes related to your event or record. It's often used for more detailed descriptions.
Start Date: This field tells the calendar when your event or record begins. It's essential for setting the start date and time.
End Date: Similar to the start date, this one lets the calendar know when your event or record ends. It helps calculate the duration.
Step 1: Getting Started in Your Model-Driven App
First things first, open your web browser and go to the
Power Apps portal.
Log in to your Power Apps account with the necessary
permissions.
Once you're in, select the environment where your
Model-Driven App lives.
Locate and open the Model-Driven App where you want to add
that cool calendar view.

Step 2: Navigating to Solutions
Now, inside your Model-Driven App, head over to the
"Settings" area. You can do this by clicking on the little cogwheel
icon (the settings icon) on the left side.
In the "Settings" area, find and click on
"Advanced Settings."


Step 3: Finding Your Solution
You'll see a list of solutions; choose the one that holds
the table (or entity) where you want to add the calendar view. If you haven't
created a solution yet, you might need to do that first to manage your
customizations.

Step 4: Time to Dive into Your Entity (Table)
Inside your selected solution, you'll find a list of
entities (tables). Find the one that you're interested in and click on it to
open its details.

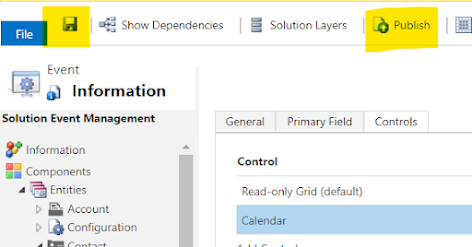
Step 5: Let's Add a Control
In the entity details, look for the "Controls"
tab. That's where you can add custom controls, including the calendar view.

Step 6: Adding the Calendar Control
Click the "+ Add Control" button to create a new
control.
In the control setup window, give your control a name that
makes sense, like "Calendar View."
For the control type, pick "Calendar" from the
options.
Hit "Save" or "OK" after filling in the
details to create the control.

Step 7: Customizing Your Calendar Control
Now that you've added the calendar control, it's time to
make it your own. Configure its settings according to your needs. You can
decide which fields from your entity should show up on the calendar, set
default views, and tweak the way it looks.

Step 8: Saving and Publishing
Don't forget to save your changes. Once you're happy with
your calendar setup, click "Save."
To make these changes live in your Model-Driven App, hit the
"Publish All Customizations" button. The exact wording may vary
depending on your Power Platform version.
Step 9: Testing Your Calendar View
Go back to your Model-Driven App, find the entity (table)
you've customized, and see if the calendar view is up and running as you
expected. Refresh the app a few times.
Congratulations! You've successfully added a calendar view
to your table in a Model-Driven App using the classic view in Power Apps. This
calendar view will make managing your time-based data much more intuitive and
visually appealing.
Comments
Post a Comment