
Creating a Power Automate Flow: Sending Emails with Attachments
Microsoft Power
Automate is a powerful tool that allows you to automate workflows seamlessly
across different applications and services. In this blog post, we will walk
through the process of creating a Power Automate flow to send emails with
attachments using a bound action, the out-of-the-box email table, and email
attachments table.
Before we dive into
the steps, make sure you have the following prerequisites:
- Access to Microsoft Power Automate.
- Necessary permissions to create flows and
connections.
- Understanding of Power Automate basics.
Overview
Our goal is to create
a flow that triggers an email with attachments based on certain conditions.
We'll utilize a bound action, the out-of-the-box email connector, and the email
attachments table. The flow will exclude the steps that involve the Adobe connector.
Steps to Create the Power Automate Flow
1. Trigger
Our flow will start with a trigger. In this example, we use the "When a Row is Added, Modified, or Deleted" trigger. This trigger listens for changes in a specified table.
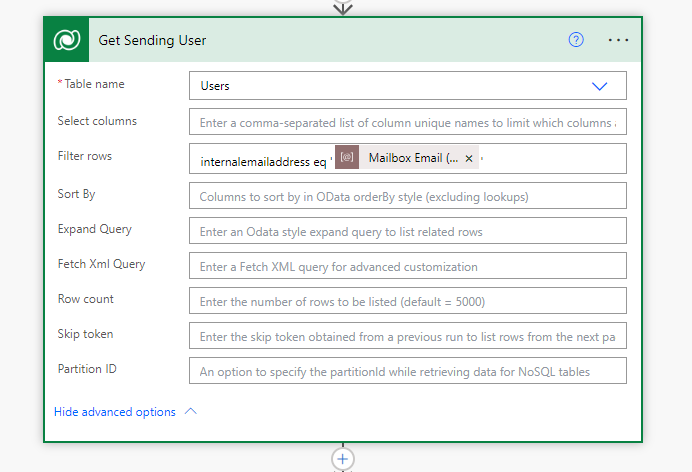
2. Get Sending User
We retrieve
information about the user triggering the flow. This step involves using the
Common Data Service connector to query the "systemusers" entity based
on the user's email address.
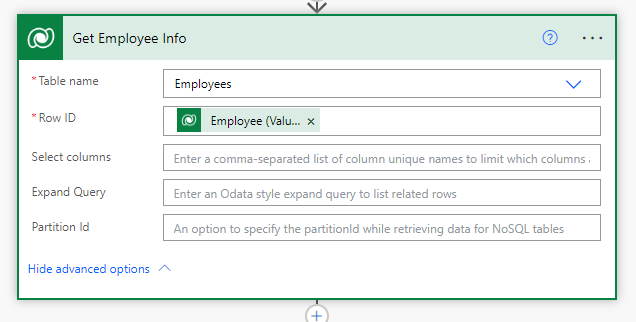
3. Get Recipient Information
Retrieve information
about the employee associated with the trigger. This involves querying mostly "contact" entity in the Common Data Service. If you want to send email to a custom entity record: Click Here
4. Document Template
Compose the email body
using an HTML template. This template includes employee details, the HTML
table, and other relevant information. In my case I'm using a HTML table as my document Template. You can simply use a compose function and add static HTML code.

5. Email Template
Body
Compose the body of
the email using another HTML template.

6. Create File
Create an HTML file in
OneDrive with the composed Document template.

7. Convert File
Convert the HTML file
to a PDF file.

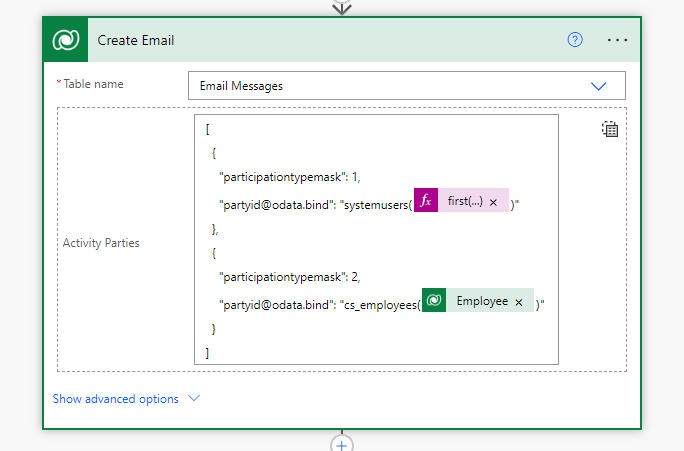
16. Create Email
Create an email record using the Email Template as description and define Activity Party Attributes:

Or you can configure using a JSON
17. Add Attachment
Create an email
attachment using the retrieved PDF file content and attach it to the email.

Parameters:
- Entity Name: "activitymimeattachments"
- Attachment ID: Auto-generated (@null)
- Attachment Number: 0
- Object Type Code: "email"
- Object ID (Email Record): Dynamically binds to the output of
"Create_Email" action.
- Attachment Body: Uses the PDF content from the output of
"Get_file_content" action.
- Filename: Uses the subject of the email with a
".pdf" extension.
- MIME Type: Uses the file content type from the
output of "Protect_PDF_from_Viewing" action.
- Subject: Uses the subject of the email from the output of
"Create_Email" action.
19. Perform a Bound
Action
Use the Common Data
Service connector to perform a bound action, the
"SendEmail" action, to send the email.

This blog post covers
the essential steps to create a Power Automate flow for sending emails with
attachments. The flow incorporates Common Data Service connectors, HTML
templates, and actions for file creation and email sending. For specific
business needs, additional steps and customization can be implemented.
Comments
Post a Comment